Essential Watercolor Composition Tips for Beautiful Floral Art
- Jan 22, 2025
- 7 min read
Updated: May 21, 2025
Composition can make or break your paintings. When you do it right, it’s so natural that the viewer won’t even think about it, and when you do it wrong, something will always just look a little bit “off.” In this blog post, I’m going to share practical composition techniques that will elevate your floral artwork. Just a few minutes of thoughtful planning before you pick up your brush can transform your paintings from good to extraordinary.
Many watercolor beginners rush this process because they’re excited to jump right into painting. The thing is though, the painting part is so much more fun and relaxing when you have a good composition as your foundation.
A lot of new artists also overlook composition because it can feel really intimidating. But with the techniques you’ll learn in this article and a little practice, composition will start to feel more natural and fun as time goes on!
Let’s dive into it, shall we?
Transform this...

...Into this!

Composition Fundamentals
First, let’s get clear about what “composition” actually means. Simply put, it’s how the elements of your painting are arranged on the paper. In this article, I’ll be primarily talking about composition tips for floral watercolor art, but these composition tips apply to all different subjects. Here are a few of the key things to consider when creating your composition.
Use Odd Numbers
A general rule of thumb for composition is to use odd numbers of elements in your paintings. There are a few reasons for this.
Nature reflects odd groupings. Nature is perfectly imperfect and more often than not you’ll find odd numbers of leaves, petals, or blooms on real flowers. Mimicking these natural patterns in art helps your paintings to feel more organic and true to life.
Asymmetry is more visually interesting. Our brains are wired to identify patterns. When we create art with odd numbers it strays from the pattern the viewer’s brain is expecting. This creates some tension, which is not necessarily a bad thing. That slight tension draws the viewer in and keeps their attention longer as their brain tries to “resolve” the pattern.
Identify the “Hero” and “Supporting Characters”
Dynamic floral compositions are filled with lots of different elements. It’s up to you to decide which ones are the main focal point of your illustration. These are your “hero” or “showstopping” elements. In most cases, you don’t want your heroes floating aimlessly on the page. The things that bring a composition together are the supporting elements like leaves, buds, and stems. These are not necessarily the focus of your piece, but they help the viewer understand what’s happening and provide a frame to help your heroes shine!
There are a few ways to distinguish the heroes and supporting elements in a design. One is to make your heroes larger and more prominent. Another is to keep the heroes in the foreground of the composition. And lastly, it can be really helpful to paint your hero elements with more detail than the supporting pieces. This will help the supporting characters fall into the background so the heroes can shine!
For example, in this hibiscus composition, the main hero elements are the hibiscus flowers and the supporting characters are the leaves and budding flowers. Without the supporting characters, this painting would be flat, but they don’t need to be as detailed or as large as the main focal points.
Keep the Eye Moving
Once you’ve identified your heroes and supporting characters, you can start to arrange them! Vary the size, shape, and placement of the flowers to encourage the viewer’s eye to explore the entire composition. Avoid clustering all the large elements in one area. One way to do this is to use the idea of a letter “C” or a zig zag shape to place your hero elements across the page. When you use an odd number of elements, this can create a really pleasing composition that guides the viewer’s eyes across the page seamlessly.
In my hibiscus example, I’ve used a backwards “C” shape to arrange the main flowers. The hero flowers take the viewer’s eye from the top left of the page to the bottom right in a zig-zag formation. Here are some examples to help you visualize this! Note how one flower leads the eye to the next and that guides the eye to the next part of the painting.


Overlap Elements for More Depth and Interest
You want to make sure that your elements aren’t just floating on the page or barely touching. In nature, flowers are clustered together and are overlapped by leaves, stems, and petals. Try mimicking this in your own artwork by overlapping your elements and tucking things in so that it feels more organic.


Showcase the Flower at Different Stages
Traditionally, botanical artwork captures different stages of a plant’s life cycle. With that in mind, you might want to include a bud, a flower that is just starting to open, and a fully blooming flower. You will want to include stems and foliage, as well to ground the painting and give some context.
Below on the left is a print of a painting done by Pierre-Joseph Redouté, considered by many to be the father of botanical illustration. You can see his careful composition shows you the flower blossoms from different angles, the buds, foliage, and stems. On the right is one of my paintings using the same principle.

Ask Yourself What Might Add More Visual Interest
Many of my students have a goal of creating 3D art that feels lifelike and natural. One way to improve your floral compositions is to make sure you’re always asking yourself how you can add more visual interest. You can add visual interest in so many different ways. Some examples are adding shading to create more depth, adding a background, adding shadows, and creating more texture on your flowers with contour lines and details.

Using Reference Images
An important part of creating lifelike compositions is to use reference images while you’re drawing. References help you understand what the flower actually looks like so that you can draw and paint it accurately.
Lots of times, I’ll look at a variety of reference photos and then create a final sketch based on an amalgamation of all of them—combining them into a different arrangement, changing angles, and making something unique.
Be careful if you use someone else’s photo because it is frequently against copyright law to copy a photo and create a painting from it, especially if you plan to make any money from your work.
The best thing is always to take your own reference pictures, but there are also stock photos that you can buy the rights to online or you can try royalty-free stock photo sites like Unsplash!

Creating Your Composition
Choose the Size of Your Artwork
Knowing the final size of your artwork is the first step to starting your composition. You need to know what your canvas will be like in order to apply the composition fundamentals we went over earlier. Are you painting a 5x7 card? A square painting? A bookmark? There are endless possibilities and there’s no wrong answer! Just make sure to identify the size before you start sketching out composition ideas.
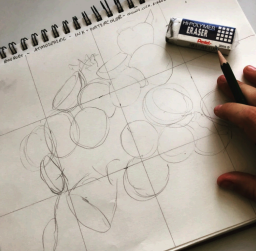
Start with Small Sketches
I encourage my students to start with a bunch of small sketches (also known as “thumbnail sketches”) to help them loosen up and brainstorm. These should be small, messy sketches to get your ideas out on paper. There’s no need for perfection. All you need to do is sketch some loose shapes to represent your flowers and explore what kinds of compositions you can come up with.
In this photo, you can see the loose idea-generating sketches I did beforehand lined up with the finished paintings. Nothing but a rectangle to represent the paper and some loose shapes, but often that is enough to help you map out your composition.

Choose Your Favorite and Start Drawing!
After your brainstorming session, choose one of the loose compositions that you like the best. This will be the foundation of your larger composition. Don’t worry, you can still make any changes you want. But it’s important to pick a starting point!
Now, mark out an area in your sketchbook that’s the same size as your final drawing. It’s important to keep this process in your sketchbook because you’ll probably still want to do some erasing, redrawing, and rearranging. If you do that process on nice watercolor paper it can hurt the paper and negatively impact your final piece. So keep it in your sketchbook for now.

Now it’s time to start refining your sketch. Start drawing your final composition and adding more details to your flowers. This doesn’t have to be the most detailed floral drawing of your life, but it should clearly show the most important shapes so that you have an outline of what to paint where. Here’s a timelapse video of my composition process. You’ll notice that I do a lot of rearranging, erasing, and playing around with different things before landing on my final composition.
Don’t let perfectionism keep you from starting. I know this part can be the most intimidating, but if you don’t start, you’ll never reach the final destination. Go into it knowing that your first sketch won’t be perfect and that that’s ok. Take your time to refine your work and soon you’ll have a beautiful final composition that you’ll be excited to paint!
Finalize Your Sketch and Transfer to Watercolor Paper
Once you’re happy with your sketch, the final step is to transfer it to watercolor paper so you can start painting! To do this, first start by choosing the lines that are the most important and draw over them with a darker line. This will ensure that they show up when you transfer the sketch to watercolor paper.

Finally, use whatever method you prefer to transfer the sketch to watercolor paper. If you want to learn more about how to do that, check out this blog post next!
I hope this article helped boost your composition confidence! Remember, the more you practice, the better you’ll get. This may feel tricky at first, but every original composition you create will help you build this skill and soon it will feel so much more fun and natural.
Happy painting,
Alex
PS: Here’s one last bonus tip for you: don’t be afraid to break the “rules” above. It’s great to have some helpful tips and structure for your paintings, but the most important thing is to put your brush to paper and start creating!
